Kami Solver

Actually, all puzzles data are located in the “puzzles” folder under the game directory, including classic group from A to E, and pays needed premium “5C1” and “Pat1”.
PuzzleData are stored in files such as SAL1_TwoSides.xml(Stage A Level 1). colours variable denotes the grid. gold, silver, bronze variables are the moves count to achieve these medals. The “solution” part, well, is the solution. Following computer world’s tradition, in each turn, x, y mean the column, row coordinates, both originating from 0.
If solution is all your want, it’s done.
Here is my KamiSolver. It works out in seconds for most cases, but sometimes takes longer particularly when zones are much scattered and maximum moves are larger.
The whole idea is: calculate all possible moves from the initial lattice, and then the possible moves of each of those moves … typical depth first search algorithm.
Here are some tune tech used:
-
Given the maximum moves, we do not need to go deep down, i.e. to a lattice with single color. Whenever the count of colors we have to wipe out is larger than the moves we left, this try has no future and can be closed. Because one move can only decrease one color at most.
-
If after a candidate move, the lattice is someone which we have checked before, it is ignored. It is very common for turn sequences like [A, B] and [B, A].
There is no need to walk along a wrong path twice, right? But there are exceptions. Just ignoring it would result in solution miss.
What if the second solution has less moves? e.g. [D, E] reaches the same lattice as [A, B, C] dose. Then it should be reconsidered, and the solution log is updated with less moves for later reference. -
If a candidate dose not decrease the zone count, it is dismissed. FYI, zones are scattered area according to color connectivity. This kind of candidate is a move with an aiming color not found in its neighborhoods. It is not an effective move.
Will the lattice reached from such move be met again after a sequence of effective moves which downsize zone counts? Indeed.
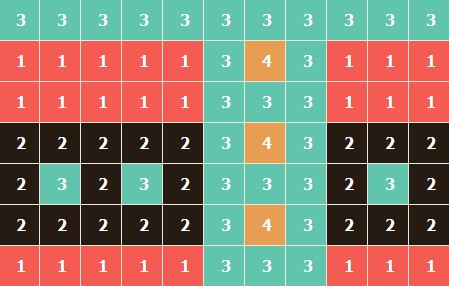
For example, when faced with the lattice shown in the following picture, these two turn sequences reached the same status.
- Change left black 2’s to red 1’s, zone count decreases by 2. Then change it back to black 2’s, zone count remains the same.
- Change upper-left red 1’s to black 2’s, zone count decreases by 1. Then change lower-left red 1’s to black 2’s, zone count decreases by 1.
Since one step in solution 1) can achieve the goal, why bother two steps in solution 2)?
It seems we should just add the lattice in the blacklist, and should not give a second consideration, unlike the situations in tune tech #2.
Does this rule have exceptions? What if the latter solution has less moves? I am not sure, but I believe not. Anyway I include a similar reconsideration mechanism just in case. It can be removed for performance improvement.

- Candidate moves are checked in some preferential order:
- Less zone count. A better move should decrease more zones.
- Larger zone combined. A better move should make the combined zone with more cells.
Usually these preferences are cool, one try hits the right solution.
But, for some levels, the right solution comes out from latter candidates, not with the least zone count, nor with the largest zone combined.
I guess that is why it is so fascinating.
You can add your preferences strategy and do some tests to check whether it works. Actually, Number of single zones has been added. Single zone is a zone whose color only shows in this zone. Its increase means a color with scattered zones has joined. Unfortunately, it turns out not that helpful.
PS: If you want to design a puzzle level, BFSolve function (Breadth First Search) in the solver would be helpful to get the maximum moves.